Objective:
In this article, we will go over step by step to deploy Imply manager on-prem using Kubernetes, on 4 nodes: 1x master, 1x query, and 2x data nodes.
Environment setup:
1. In this article, We use external Zookeeper for Druid
2. We use external HDFS as deep storage
3. We use external MySQL as meta DB for both Imply Manager, and Druid.
4. We use CentOS 7 on all the nodes, but the OS in Imply on-prem manager is Ubuntu based.
Prerequisites:
0. Create an user account at https://www.docker.com
Note: Please contact Imply sales representatives FIRST for account setup, provide us your docker username, so we grant permission to download from our private repo.
Install Docker on all 4 nodes:
1. Install yum and git utilities on all nodes:
  yum install -y yum-utils   device-mapper-persistent-data   lvm2
  yum install -y git
  yum-config-manager --enable rhel-7-server-extras-rpms
2. Setup Docker repo, and install Docker (community edition) on all nodes.
yum-config-manager --add-repo https://download.docker.com/linux/centos/docker-ce.repo
yum install -y ftp://bo.mirror.garr.it/1/slc/centos/7.1.1503/extras/x86_64/Packages/container-selinux-2.9-4.el7.noarch.rpm
yum -y install docker-ce docker-ce-cli containerd.io
3. Start Docker and verify successful installation
# systemctl start docker
# docker version
 Client:
 Version:           18.09.2
 API version:       1.39
 Go version:        go1.10.6
 Git commit:        6247962
 Built:             Sun Feb 10 04:13:27 2019
 OS/Arch:           linux/amd64
 Experimental:      false
Server: Docker Engine - Community
 Engine:
  Version:          18.09.2
  API version:      1.39 (minimum version 1.12)
  Go version:       go1.10.6
  Git commit:       6247962
  Built:            Sun Feb 10 03:47:25 2019
  OS/Arch:          linux/amd64
  Experimental:     false
Install kubernetes on all 4 nodes:
1. Add Kubernetes repo to all nodes:
[root@ip-172-31-7-220 Docker]# cat /etc/yum.repos.d/kubernetes.repo
[kubernetes]
name=Kubernetes
baseurl=https://packages.cloud.google.com/yum/repos/kubernetes-el7-x86_64
enabled=1
gpgcheck=1
repo_gpgcheck=1
gpgkey=https://packages.cloud.google.com/yum/doc/yum-key.gpg https://packages.cloud.google.com/yum/doc/rpm-package-key.gpg
2. Configure environment settings on all nodes:
# setenforce 0

# vi /etc/selinux/config
    SELINUX=permissive ##Change if it is enforcing

# cat <<EOF >  /etc/sysctl.d/k8s.conf
net.bridge.bridge-nf-call-ip6tables = 1
net.bridge.bridge-nf-call-iptables = 1
EOF
3. Install Kubernetes on all nodes:
[root@ip-172-31-7-220 Docker]# yum -y install kubelet kubeadm kubectl
Build a Kubernetes cluster
1. Initialize Kubernetes admin on one of the nodes, as root user, due to privilege requirements.
[rootr@ip-172-31-7-220 ec2-user]# kubeadm init
[init] Using Kubernetes version: v1.15.1
…….
Your Kubernetes master has initialized successfully!
To start using your cluster, you need to run the following as a regular user:
  mkdir -p $HOME/.kube
  sudo cp -i /etc/kubernetes/admin.conf $HOME/.kube/config
  sudo chown $(id -u):$(id -g) $HOME/.kube/config
You should now deploy a pod network to the cluster.
Run "kubectl apply -f [podnetwork].yaml" with one of the options listed at:
  https://kubernetes.io/docs/concepts/cluster-administration/addons/
You can now join any number of machines by running the following on each node
as root:
  kubeadm join 172.31.7.220:6443 --token 4mhtc3.27s6iiaxcggwsi38 --discovery-token-ca-cert-hash sha256:be9ad8be83276854ba93a213bbddc61af476bb016f9f7939a713baec2fe9c7d1
2. Follow the on screen instruction to copy the config files over as regular user. ("ec2-user") in this case.
  mkdir -p $HOME/.kube
  sudo cp -i /etc/kubernetes/admin.conf $HOME/.kube/config
  sudo chown $(id -u):$(id -g) $HOME/.kube/config
3. Follow the on screen instruction to add the other nodes to this Kubernetes cluster
#   kubeadm join 172.31.7.220:6443 --token 4mhtc3.27s6iiaxcggwsi38 --discovery-token-ca-cert-hash sha256:be9ad8be83276854ba93a213bbddc61af476bb016f9f7939a713baec2fe9c7d1
……..
4. Verify all nodes have joined this Kubernetes cluster by running command 'kubectl get nodes' on the master to see this node join the cluster.
[ec2-user@ip-172-31-7-220 sysctl.d]# kubectl get nodes
NAME                                          STATUS     ROLES    AGE     VERSION
ip-172-31-4-67.us-west-2.compute.internal     NotReady   <none>   34m     v1.15.1
ip-172-31-5-160.us-west-2.compute.internal    NotReady   <none>   37m     v1.15.1
ip-172-31-5-3.us-west-2.compute.internal      NotReady   <none>   35m     v1.15.1
ip-172-31-7-220.us-west-2.compute.internal    NotReady   master   39m     v1.15.1
Note, all the nodes are showing 'NotReady' under STATUS column.
5. To make the nodes ready, We need to create a pod network. We can use some sample pod network settings on the internet to create one.
# kubectl apply -n kube-system -f "https://cloud.weave.works/k8s/net?k8s-version=$(kubectl version|base64 | tr -d '\n')"
serviceaccount/weave-net created
clusterrole.rbac.authorization.k8s.io/weave-net created
clusterrolebinding.rbac.authorization.k8s.io/weave-net created
role.rbac.authorization.k8s.io/weave-net created
rolebinding.rbac.authorization.k8s.io/weave-net created
daemonset.extensions/weave-net created
6. Give it some time and the nodes will become Ready.
[ec2-user@ip-172-31-7-220 ec2-user]# kubectl get nodes
NAME                                          STATUS     ROLES    AGE     VERSION
ip-172-31-4-67.us-west-2.compute.internal     NotReady   <none>   34m     v1.15.1
ip-172-31-5-160.us-west-2.compute.internal    NotReady   <none>   37m     v1.15.1
ip-172-31-5-3.us-west-2.compute.internal      NotReady   <none>   35m     v1.15.1
ip-172-31-7-220.us-west-2.compute.internal    NotReady   master   39m     v1.15.1
[root@ip-172-31-7-220 ec2-user]# kubectl get nodes
NAME                                          STATUS   ROLES    AGE     VERSION
ip-172-31-4-67.us-west-2.compute.internal     Ready    <none>   36m     v1.15.1
ip-172-31-5-160.us-west-2.compute.internal    Ready    <none>   38m     v1.15.1
ip-172-31-5-3.us-west-2.compute.internal      Ready    <none>   37m     v1.15.1
ip-172-31-7-220.us-west-2.compute.internal    Ready    master   40m     v1.15.1
7. (OPTIONAL) Kubernetes also relies on labeling nodes to assign distributed services. Here we assign one node as Druid's master, two as data, and the last as query. Skipping this step will let Kubernetes decide which node to spawn which service.
# kubectl label nodes ip-172-31-7-220.us-west-2.compute.internal nodeType=master
# kubectl label nodes ip-172-31-5-160.us-west-2.compute.internal nodeType=data
# kubectl label nodes ip-172-31-5-3.us-west-2.compute.internal nodeType=data
# kubectl label nodes ip-172-31-4-67.us-west-2.compute.internal nodeType=query
8. (OPTIONAL) By default, no pods can be scheduled to spawn on Kubernete's master, which is also recommended in production environment. However, for this lab, we remove this restriction.
kubectl taint nodes --all node-role.kubernetes.io/master-
Now we are ready to spawn the Imply on-prem using Kubernetes.
Install helm on the master node:
1. Install "home brew" first
  [ec2-user@ip-172-31-7-220 ~]$ sh -c "$(curl -fsSL https://raw.githubusercontent.com/Linuxbrew/install/master/install.sh)"

  ==> Installing Ruby to /home/linuxbrew/.linuxbrew/Homebrew/Library/Homebrew/vendor
2. Install "Kubernetes-helm"
[ec2-user@ip-172-31-7-220 ~]$ brew install kubernetes-helm
3. Initialize helm:
[ec2-user@ip-172-31-7-220 ec2-user]# helm init --history-max 200
Configure and install Imply on-prem Manager
Now we are ready to deploy the Imply Manager on this 4-node cluster.
[ec2-user@ip-172-31-7-220 ec2-user]# helm repo add imply https://static.imply.io/onprem/helm
[ec2-user@ip-172-31-7-220 ec2-user]# helm repo update
Hang tight while we grab the latest from your chart repositories...
...Skip local chart repository
...Successfully got an update from the "imply" chart repository
...Successfully got an update from the "stable" chart repository
Update Complete.
[ec2-user@ip-172-31-7-220 ~]$ helm repo list
NAME    URL
stable  https://kubernetes-charts.storage.googleapis.com
local   http://127.0.0.1:8879/charts
imply   https://static.imply.io/onprem/helm
[ec2-user@ip-172-31-7-220 ~]$ helm search imply
NAME            CHART VERSION   APP VERSION     DESCRIPTION
imply/imply     0.1.1           3.0.6-PREVIEW   Imply Manager (PREVIEW)
2. create helm secrets, using your Docker login credential
  [ec2-user@ip-172-31-7-220 ~]$ kubectl create secret docker-registry regcred --docker-server=https://index.docker.io/v1/
  --docker-username=<USERNAME> --docker-email=<EMAIL> --docker-password=<PASSWORD>

  secret/regcred created
3. Download the helm chart from Imply
[ec2-user@ip-172-31-7-220 ~]$ helm fetch --untar imply/imply
4. Find the "value.yaml" file under "imply" directory you just download, and modify it as following example
[ec2-user@ip-172-31-7-220 imply]$ cat values.yaml
meOverride:
fullnameOverride:
images:
  manager:
    repository: imply/onprem-manager
    tag: 3.0.6-PREVIEW
  agent:
    repository: imply/onprem-agent
    tag: 2019-07-30-PREVIEW
  pullPolicy: IfNotPresent
  imagePullSecrets:
    - name: regcred

manager:
  licenseKey: |
   {"name":"Ming","expiryDate":"3000-01-01","features":["alerts","cross-tab"]}|2019-07-25|<HASH>
  initialClusterName: default
  metadataStore:
    type: mysql
    host: ip-172-31-4-67.us-west-2.compute.internal
    port: 3306
    user: root
    password: hadoop
    database: imply-manager
  resources:
    requests:
      cpu: 200m
      memory: 500M
  nodeSelector:
    nodeType: master
  tolerations: []
  affinity: {}
  annotations: {}
  serviceType: ClusterIP
  port: 9097
druid:
  metadataStore:
    type: mysql
    host: ip-172-31-4-67.us-west-2.compute.internal
    port: 3306
    user: root
    password: hadoop
    database: imply-k8s
  zk:
    connectString: ip-172-31-4-67.us-west-2.compute.internal,ip-172-31-5-160.us-west-2.compute.internal,ip-172-31-5-3.us-west-2.compute.internal
    basePath: imply
  deepStorage:
    type: hdfs
    baseLocation: "hdfs://ip-172-31-7-220.us-west-2.compute.internal/druid-k8s/segments"
ingress:
  enabled: false
  annotations: {}
  manager:
    host: manager.mydomain.com
    path: /*
  pivot:
    host: mydomain.com
    path: /*
  router:
    host: api.mydomain.com
    path: /*
  tls: []
nfsVolumeClaim:
  enabled: false
  mountPath: "/mnt/nfs"
  baseLocationOverride: "/mnt/nfs/druid"
  storageClassName: imply-nfs
  resources:
    requests:
      storage: 8Gi
master:
  replicaCount: 1
  resources:
      requests:
        cpu: 200m
        memory: 800M
  nodeSelector:
    nodeType: master
  tolerations: []
  affinity: {}
  annotations: {}
  coordinatorPort: 8081
  overlordPort: 8090
query:
  replicaCount: 1
  resources:
      requests:
        cpu: 300m
        memory: 1200M
  nodeSelector:
    nodeType: query
  tolerations: []
  affinity: {}
  annotations: {}
  serviceType: ClusterIP
  routerPort: 8888
  routerTlsPort: 9088
  pivotPort: 9095
data:
  replicaCount: 2
  resources:
      requests:
        cpu: 300m
        memory: 1500M
  nodeSelector:
    nodeType: data
  tolerations: []
  affinity: {}
  annotations: {}
Helm Chart brief explanation :
- "images: manager: repository:" and "images: agent: repository:" : This chart will download from Imply's two private repos: "imply/onprem-manager" and "imply/onprem-agent"
- "manager: licenseKey:" : You need to obtain the license key to be able to use Imply Manager
- "manager:metadataStore:" and "druid:metadataStore" : The external MySQL DB is set on host "ip-172-31-4-67.us-west-2.compute.internal", with username and password, database name provided here, for both Imply Manager, and Druid to use.
- "manager:nodeSelector" : Kubernetes node that's labeled with "nodeType=master" will host the Imply Manager service
- "manager:port" : Imply Manager runs on port 9097 by default
- "druid:zk:" and "druid:deepStorage" : Information of the external zookeeper and deep storage is also provided here
- "master: replicaCount:" : decides number of pods spawned to run the master processes: Overlord and Coordinator. In our example, we only configure one master service.
Similar configurations are set for "query" and "data" services as well.
5. Go to the parent directory, and Deploy Imply with helm:
[ec2-user@ip-172-31-7-220 ~]$ cd ..
[ec2-user@ip-172-31-7-220 ~]$ helm install imply
  NAME: rafting-iguana
  LAST DEPLOYED: Wed Aug 21 17:58:42 2019
  NAMESPACE: default
  STATUS: DEPLOYED
Note helm generated a random instance name for us: "rafting-iguana"
6. Verify:
[ec2-user@ip-172-31-7-220 ~]$ helm status rafting-iguana
LAST DEPLOYED: Wed Aug 21 17:58:42 2019
NAMESPACE: default
STATUS: DEPLOYED

...
==> v1/Pod(related)
NAME                                          READY  STATUS   RESTARTS  AGE
rafting-iguana-imply-data-b4d7d6bdf-kwnx2     0/1    Pending  0         12m
rafting-iguana-imply-data-b4d7d6bdf-m7t2b     0/1    Pending  0         12m
rafting-iguana-imply-manager-dcb9bc875-qzf9g  0/1    Pending  0         12m
rafting-iguana-imply-master-54876c5658-fph2t  0/1    Pending  0         12m
rafting-iguana-imply-query-fd6b7cfd6-gx4dc    0/1    Pending  0         12m
rafting-iguana-mysql-6dc56fbb8f-krwpl         0/1    Pending  0         12m
rafting-iguana-nfs-server-provisioner-0       1/1    Running  0         12m
rafting-iguana-zookeeper-0                    0/1    Pending  0         12m

==> v1/Secret
NAME                  TYPE    DATA  AGE
rafting-iguana-mysql  Opaque  2     12m

==> v1/Service
NAME                                   TYPE       CLUSTER-IP     EXTERNAL-IP  PORT(S)                                 AGE
rafting-iguana-imply-manager           ClusterIP  10.107.154.8          9097/TCP,9989/TCP,9998/TCP,9999/TCP     12m
rafting-iguana-imply-query             ClusterIP  10.102.158.76         8888/TCP,9088/TCP,9095/TCP              12m
rafting-iguana-mysql                   ClusterIP  10.107.64.253         3306/TCP                                12m
rafting-iguana-nfs-server-provisioner  ClusterIP  10.97.196.46          2049/TCP,20048/TCP,51413/TCP,51413/UDP  12m
rafting-iguana-zookeeper               ClusterIP  10.97.210.171         2181/TCP                                12m
rafting-iguana-zookeeper-headless      ClusterIP  None                  2181/TCP,3888/TCP,2888/TCP              12m
Wait for awhile until all instance status are "Ready"
[ec2-user@ip-172-31-7-220 ~]$ kubectl get pods
NAME                                           READY   STATUS    RESTARTS   AGE
rafting-iguana-imply-data-b4d7d6bdf-kwnx2      1/1     Running   2          29m
rafting-iguana-imply-data-b4d7d6bdf-m7t2b      1/1     Running   2          29m
rafting-iguana-imply-manager-dcb9bc875-qzf9g   1/1     Running   0          29m
rafting-iguana-imply-master-54876c5658-fph2t   1/1     Running   0          29m
rafting-iguana-imply-query-fd6b7cfd6-gx4dc     1/1     Running   1          29m
rafting-iguana-mysql-6dc56fbb8f-krwpl          0/1     Pending   0          29m
rafting-iguana-nfs-server-provisioner-0        1/1     Running   0          29m
rafting-iguana-zookeeper-0                     0/1     Pending   0          29m
Find details about each kubernetes instances. Make sure they are running on nodes they are assigned to with "nodeType". For example:
[ec2-user@ip-172-31-7-220 ~]$ kubectl describe pod rafting-iguana-imply-master-54876c5658-fph2t
Name:           rafting-iguana-imply-master-54876c5658-fph2t
Namespace:      default
Priority:       0
Node:           ip-172-31-7-220.us-west-2.compute.internal/172.31.7.220
Start Time:     Wed, 21 Aug 2019 18:24:21 +0000
Labels:         app.kubernetes.io/instance=rafting-iguana
                app.kubernetes.io/name=imply-master
                pod-template-hash=54876c5658
Annotations:
Status:         Running
IP:             10.44.0.1
....
Node-Selectors: nodeType=master
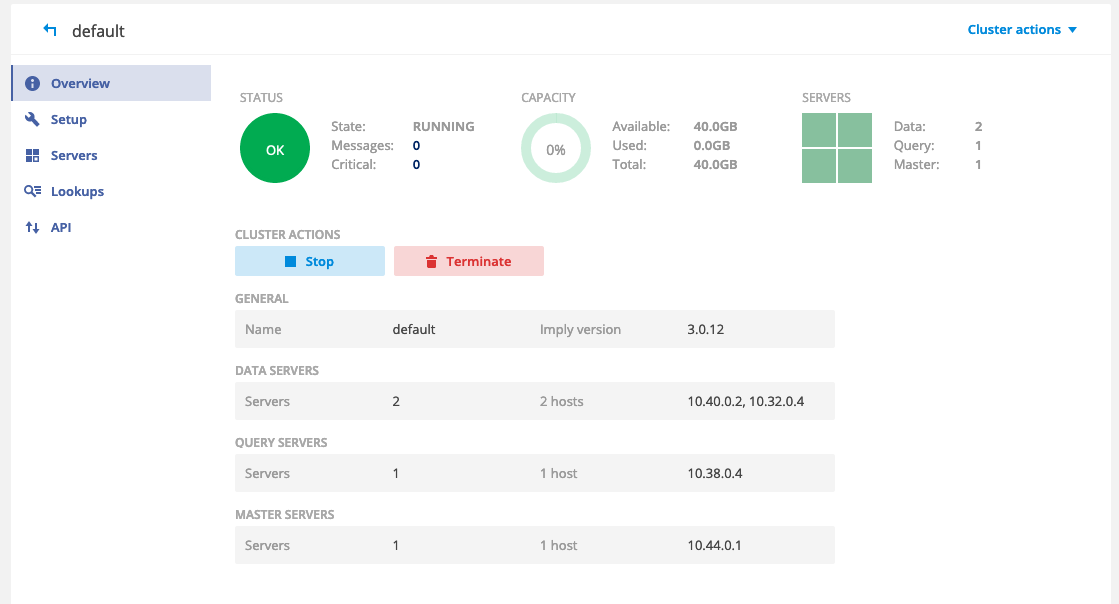
Access master UIs, using the Kubernetes instance internal IPs. For example, "10.44.0.1:8081" and "10.44.01:8090", and so on.
Run a sample ingestion task and query task to ensure full functionality of Imply Manager.
Congratulations. You now have Imply Manager successfully set up on your multi-node cluster.
Troubleshoot some common issues:
1. Unable to install Imply with "failed to download" error, even after updating the repo again as suggested
  [ec2-user@ip-172-31-7-220 imply]$ helm install imply

  Error: failed to download "imply" (hint: running `helm repo update` may help)
  [ec2-user@ip-172-31-7-220 imply]$ helm repo update

  Hang tight while we grab the latest from your chart repositories...

  ...Skip local chart repository

  ...Successfully got an update from the "imply" chart repository

  ...Successfully got an update from the "stable" chart repository

  Update Complete.
  [ec2-user@ip-172-31-7-220 imply]$ helm install imply --debug
  [debug] Created tunnel using local port: '44054'
  [debug] SERVER: "127.0.0.1:44054"
  [debug] Original chart version: ""
  Error: Non-absolute URLs should be in form of repo_name/path_to_chart, got: imply
Solution : Need to execute the "helm install imply" command in the SAME directory as where you run
helm fetch --untar imply/imply
2. Getting "no available release name found" error
  [ec2-user@ip-172-31-7-220 ~]$ helm install imply --debug
  [debug] Created tunnel using local port: '38716'
  [debug] SERVER: "127.0.0.1:38716"
  [debug] Original chart version: ""
  [debug] CHART PATH: /home/ec2-user/imply
Error: no available release name found
Another symptom is same error messages are found in the system pod "till"
[ec2-user@ip-172-31-7-220 ~]$ kubectl get pods -n kube-system
NAME READY STATUS RESTARTS AGE
.....
tiller-deploy-65867875cb-g4bsz 1/1 Running 0 26m
...

[ec2-user@ip-172-31-7-220 ~]$ kubectl logs tiller-deploy-65867875cb-g4bsz -n kube-system
....
[storage/driver] 2019/08/12 21:03:13 get: failed to get "winning-albatross.v1": configmaps "winning-albatross.v1" is forbidden: User "system:serviceaccount:kube-system:default" cannot get resource "configmaps" in API group "" in the namespace "kube-system"
[tiller] 2019/08/12 21:03:13 info: generated name winning-albatross is taken. Searching again.
[storage] 2019/08/12 21:03:13 getting release "oily-turtle.v1"
[storage/driver] 2019/08/12 21:03:13 get: failed to get "oily-turtle.v1": configmaps "oily-turtle.v1" is forbidden: User "system:serviceaccount:kube-system:default" cannot get resource "configmaps" in API group "" in the namespace "kube-system"
[tiller] 2019/08/12 21:03:13 info: generated name oily-turtle is taken. Searching again.
[storage] 2019/08/12 21:03:13 getting release "plundering-flee.v1"
[storage/driver] 2019/08/12 21:03:13 get: failed to get "plundering-flee.v1": configmaps "plundering-flee.v1" is forbidden: User "system:serviceaccount:kube-system:default" cannot get resource "configmaps" in API group "" in the namespace "kube-system"
[tiller] 2019/08/12 21:03:13 info: generated name plundering-flee is taken. Searching again.
[tiller] 2019/08/12 21:03:13 warning: No available release names found after 5 tries
[tiller] 2019/08/12 21:03:13 failed install prepare step: no available release name found
Solution: We need to reset by deleting this "tiller" instance, and creating a new one. Then reset the "helm" as well.
[ec2-user@ip-172-31-7-220 ~]$ kubectl delete pod tiller-deploy-65867875cb-g4bsz -n kube-system
pod "tiller-deploy-65867875cb-g4bsz" deleted

[ec2-user@ip-172-31-7-220 ~]$ kubectl create serviceaccount --namespace kube-system tiller
serviceaccount/tiller created

[ec2-user@ip-172-31-7-220 ~]$ kubectl create clusterrolebinding tiller-cluster-rule --clusterrole=cluster-admin --serviceaccount=kube-system:tiller
clusterrolebinding.rbac.authorization.k8s.io/tiller-cluster-rule created

[ec2-user@ip-172-31-7-220 ~]$ helm init --service-account tiller
$HELM_HOME has been configured at /home/ec2-user/.helm.
Warning: Tiller is already installed in the cluster.
(Use --client-only to suppress this message, or --upgrade to upgrade Tiller to the current version.)

[ec2-user@ip-172-31-7-220 ~]$ kubectl get pods -n kube-system
NAME                                                                 READY   STATUS    RESTARTS   AGE
....
tiller-deploy-65867875cb-lwtbg                                       1/1     Running   0          51s
....
[ec2-user@ip-172-31-7-220 ~]$ helm reset --force
Tiller (the Helm server-side component) has been uninstalled from your Kubernetes Cluster.
Finally, re-initialize helm and tiller, and install Imply again:
[ec2-user@ip-172-31-7-220 ~]$ helm init --service-account tiller
$HELM_HOME has been configured at /home/ec2-user/.helm.

Tiller (the Helm server-side component) has been installed into your Kubernetes Cluster.
[ec2-user@ip-172-31-7-220 ~]$ helm install imply --debug
Tear down the Kubernetes cluster:
[ec2-user@ip-172-31-7-220 on-prem]$ helm ls --all
NAME                   REVISION        UPDATED                         STATUS          CHART          APP VERSION    NAMESPACE
rafting-iguana         1               Mon Aug 12 21:30:17 2019        DEPLOYED        imply-0.1.1    3.0.6-PREVIEW  default

[ec2-user@ip-172-31-7-220 on-prem]$ helm delete rafting-iguana
release "rafting-iguana” deleted

[ec2-user@ip-172-31-7-220 on-prem]$ kubectl get pods
No resources found.